Grilled garlic scape and kale pizza

From Amy’s Quiet Existence blog at https://quietexistence.wordpress.com/2012/06/24/grilled-garlic-scape-and-kale-pizza/

For the pizza:
1 large pizza dough (try making a wheat dough, yum!)
1 can of crushed tomatoes (diced and sliced fresh will work well also)
Mozzarella cheese
A bunch of garlic scapes (5-8) cut into 1 inch pieces
5 large leaves of kale, rinsed and dried, de-ribbed, cut into small pieces
A handful of fresh basil

– Preheat your grill on high for 5 minutes. In the meantime roll out the dough so that it will fit onto the grill. Cover one side of the pizza with olive oil and place that side down on the grill. Lower the heat to medium and let grill for about 4 minutes. I recommend checking the pizza after two minutes and poking any air bubbles early.

– Check the underside of the pizza after 4 minutes. It should lift off easily and be perfectly charred. Slide the dough off of the grill onto a cutting board.  Top the charred side with the tomato sauce then the fresh basil. Sprinkle some fresh mozzarella over the sauce. Top with the kale and garlic scapes. I added some VT smoke & cure pepperoni for a little bite and substance (for the guy- I can handle vegetarian meals!).

– Slide the pizza back onto the grill and grill for about 6 minutes or until the bottom side is cooked.

HINTS: The second side of the dough doesn’t need to be slathered in olive oil because it is no longer sticky. It will lift right off. Also do not use too many toppings, especially cheese and tomatoes. Peeling a soggy pizza off the grill is impossible.
Why Choose Windsong Farm?

The quality of our produce is unmatched because our soils have been maintained organically for over forty years. You choose what you want and how much you want of it each week. Our on-farm pickup system is convenient and flexible.

How is our produce different from organic vegetables you purchase at Whole Foods or other grocery stores? It is vastly more nutritious because of our focus on soil health; if the soil biology isn’t functioning, then the plants can’t be healthy. If the minerals needed for maximum nutrition aren’t in the soil, then they aren’t in the plants, and are missing from the produce we eat. We believe that healthy soil translates directly into healthier people, and our goal is to grow the tastiest and most nutritious produce and provide it at its freshest directly to you.

Did you know that produce starts losing nutritional value the instant it is harvested? Vegetables that you purchase in a store have been out of the field for at least five days (and probably a whole lot longer). Our crops are harvested and distributed at the peak of ripeness; your share is harvested the day (or sometimes the day before) you receive it. You can’t get any fresher or more nutritious than that!

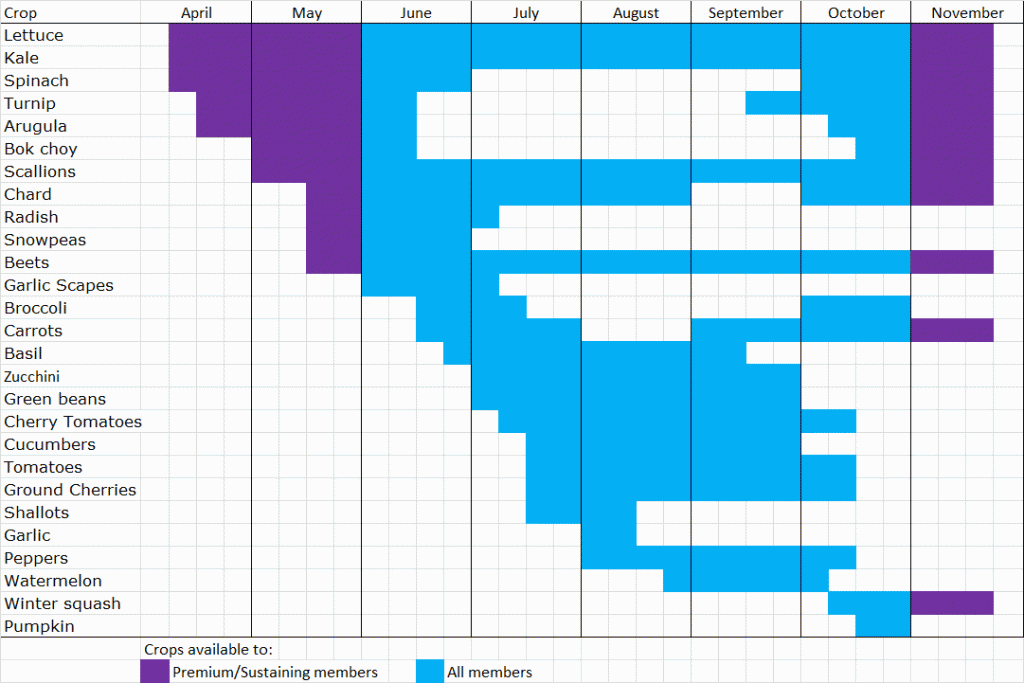
2016 Harvest Calendar

The 2017 Harvest Calendar is being created now. Distribution will start late April and run through to the week before Thanksgiving. There will be a two week break at the end of June, from June 21 through July 5. The new calendar will be similar to, but not identical with, the 2016 calendar depicted below. There will be a few crop additions (and possibility a deletion or two).

Our current plan is to start distribution for Sustaining and Premium members in mid-April and continue through to Thanksgiving week. Regular members will receive shares from early June through the end of October. Here’s a chart of our weekly harvest plan (remember with farming, there’s no guarantee!).

harvest-calendar

Hakurei Turnips

I’ll be harvesting the first Hakurei salad turnips later this week. They are tender and sweet enough to add raw to salads and are also terrific roasted and glazed. Here’s a link to more eating suggestions: Hakurei Turnips.

Easy No-Bake Veggie Lasagna

• 4-6 large zucchini
• 1 bunch kale
• 3-4 Tbsp lemon juice
• 1-2 tsp sea salt
• Your favorite tomato sauce
• Shredded mozzarella or cheddar cheese

Remove stems from kale leaves with a knife or tear the leaves from the stems. Blend kale leaves with lemon juice and salt in the food processor. Let marinate to soften, about 15 minutes. Meanwhile, peel zucchini. Using a mandolin or peeler, slice zucchini into long strips lengthwise. When you reach the seeds, do the other side (no seeds in the slices; save these bits for another recipe). In a square pan, layer slightly overlapping slices of zucchini to cover the bottom (cut slices to fit pan as needed). You can add a second layer of zucchini “lasagna noodles,” if you like. Spoon tomato sauce over the zucchini noodles. Next, add a layer of marinated kale, then top with a layer of shredded cheese. Cover with a layer of overlapping zucchini slices. Repeat this process a second or third time (sauce, kale and cheese then zucchini slices). Top with a final layer of tomato sauce. Serve or refrigerate before serving. Cut into square pieces and lift out with a spatula.

Tip: if you find your lasagna falls apart too easily, line your square pan with parchment paper first before making the lasagna. Refrigerate to set. Gently lift out the lasagna (with the parchment paper) onto a serving plate and slice into squares before serving. Gently pushing down on each layer while making the lasagna will also help, as will making sure the tomato sauce you use is thick and not on the runny side.

Variation: sprinkle nutritional yeast on the top layer of tomato sauce.
Variation: Add in 1/3-1/2 cup nutritional yeast to your tomato sauce to give it a cheesy feel.
Variation: Use spinach instead of kale or use a combination of spinach/kale.
Variation: Use your favorite nut paté instead of the cheese.

Note: We tried this last night and while there might need to be some tweaking of the directions, it was quite delicious. I wasn’t entirely satisfied with how blending the kale with lemon juice worked out. Doing it in the food processor might have been more successful and I’ll try that next time. Also, a mandolin or some such is necessary to make the noodles. Mine works well, but it’s protective hand guard isn’t shaped quite right for zucchini, so I’ll have to figure out a better way (it was the first time I used it, so practice may be all that is necessary).

Week of 7/20

Reliable chard and kale continue to produce. Zucchini and cucumbers are coming in. There’s still lettuce, scallions, and basil. Signs of red are appearing on some of the grape tomatoes, so it shouldn’t be long now. Garlic is curing and will be ready in about three weeks, and shallots are now ready for distribution. The winter squash is germinating and the watermelons are taking off. Things are looking pretty good!

Stir-Fried Chard with Ginger

This is based on a recipe I found in Mark Bittman’s How to Cook Everything.

Serves 4.

  • 1/2 lb Swiss Chard
  • 2 skinless, boneless chicken breasts, sliced into thin strips (if you want a vegetable side-dish, just omit the chicken; I added it so I could have a one skillet meal)
  • 2 tbs peanut oil (or other vegetable oil)
  • 2 tsp dry cooking sherry
  • 2 tsp soy sauce
  • 2 tbs minced fresh ginger
  • 1 clove minced garlic
  • 2 garlic scapes, cut diagonally into 2″ pieces
  • 2 chopped scallions
  • 1/2 cup water, vegetable stock, low salt chicken broth, or white wine
  • 2 tbs soy sauce
  • 1 tsp sugar
  • Salt and pepper to taste

1. If using chicken put in bowl with 2 tsp sherry and 2 tsp soy sauce. Set aside.

2. Fold the chard leaves in half along the rib and cut the rib out. Chop the ribs into 1/2 pieces; chop the leaves into approximately 2 inch squares.

2. Put a bit of the oil in a large skillet; heat over medium-high heat to just smoking and add the chicken. Stir-fry until golden brown and no longer pink in the center, a couple of minutes. Remove from skillet and set aside.

3. Put the rest of the oil in the skillet. Add ginger and garlic and cook for 15 seconds. Then add the chard ribs and garlic scapes. Stir-fry until the scapes start to have small brown spots on them.

4. Add scallions and chard leaves and cook until the leaves wilt. Add more oil if the pan gets dry.

5. Lower the heat to medium and add liquid, 2 tbs soy sauce, and sugar. Turn heat back to high and cook, stirring constantly to scrape up any browned bits on the bottom of the pan, until the liquid has thickened and partially evaporated. Stir the chicken (if using) in to coat with sauce. Add salt and pepper to taste.

6. For a meal, serve over rice or quinoa.

Oven-roasted Kale

  • 1 bunch curly leaf kale
  • 2 tbs olive oil
  • 2-3 cloves garlic, finely chopped (you could substitute garlic scapes for the garlic)
  • 1 tsp salt (to taste)
  • 1/4 tsp pepper (to taste)

Strip kale leaves from their stems and coarsely chop. Spread in a single layer on a cookie or baking sheet, add garlic, salt, pepper and drizzle olive oil over all. Toss to coat the kale evenly with the seasonings.

Put kale into a cool oven and pre-heat to 350. Halfway through the pre-heat cycle (I had to run mine once to figure out how long that is) stir/toss the kale, then return it to the oven until the temperature reaches 350. Some of the kale will be tender, and some of it will have crispy edges. Serves 2.

This recipe is adapted from the New Jersey Farm Bureau’s Newletter. Confession time: I haven’t tried it yet, but will do so soon.

2015 CSA is full!

As of March 19, the CSA membership is full for the 2015 season. Please do feel free to contact us to get on the waiting list for next year.

No GMOs!

Did you know that there’s only one label that guarantees there are no GMO anythings in the food you buy? Any produce that is certified organic, like ours is, cannot by law use any product that is derived from GMOs, or any GMO seed. So you can rest assured that your food is not only free of all pesticide residue, but is also grown from pure natural seed.