Just in time for peak sign-up season, we’re adding the “Half-Share” to our membership program. Essentially, a Half-Share is identical to the Regular share, except that you pick up every other week (for a total of 13 or 14 weeks). The cost is $350 (the slight extra is to cover the additional administrative costs) per season. Sign up here: Windsong Farm CSA Sign-up Information.
What does a farmer do during a blizzard?
Why order seeds, of course! I’ve just sent in my orders for 38 new varieties of seeds for the coming season. Together with the seeds I saved from last year that comes to around 75 different varieties of vegetables.

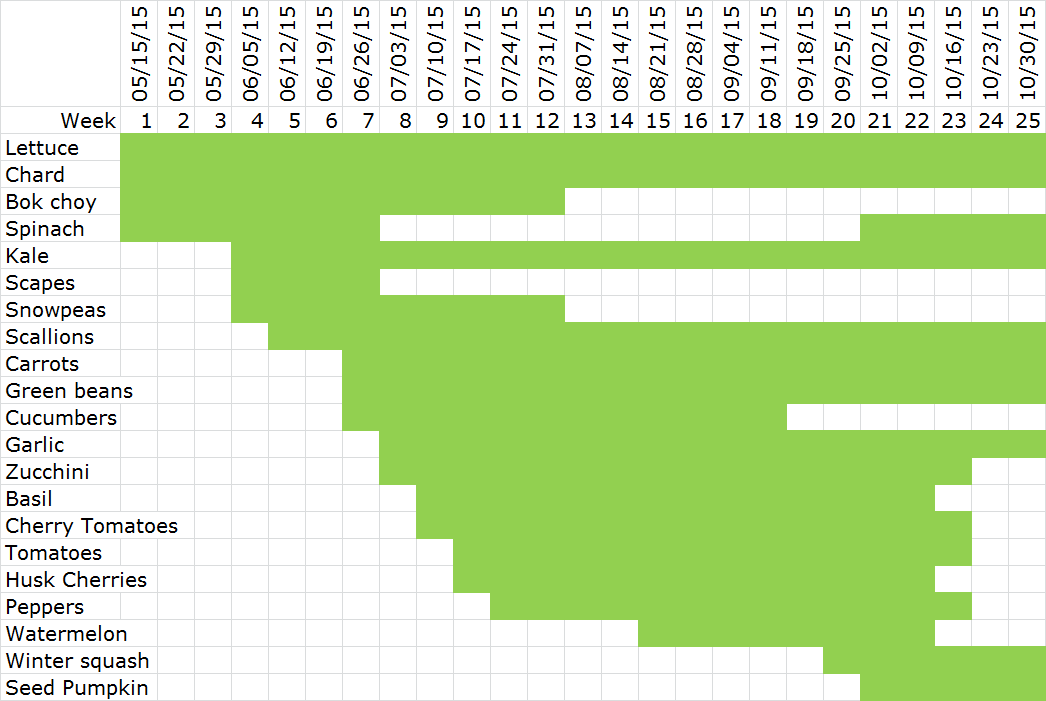
2015 Harvest Calendar
Our current plan is to start distribution about May 15 and continue through the end of October. Here’s a chart of our weekly harvest plan (remember with farming, there’s no guarantee!).
Permaculture course offered
Longtime farm supporter Wanda Knapik is offering a Permaculture Design Course in Bernardsville, beginning January 3. We are delighted that Windsong Farm will be the site of some of the fieldwork for this course and look forward to working with Wanda’s students. For more information on the course contact Knapikw at gmail. The course will lead to a certificate in Permaculture Design; for more information see http://www.permaculture.org/what-is-permaculture/certificate/.
Week of 10/19
New this week is a small quantity of kale; it is absolutely beautiful. I’ve been growing it under row covers so there is almost no insect damage. Kale loves this cooler weather. The tomatoes and zucchini and watermelon are just about finished. If it frosts tomorrow night, they will be done. I’ve got some stocked up (particularly watermelon), so there are a couple more weeks of distribution left. But the season is definitely winding down.
Week of 10/12
There are still plenty of tomatoes, lots of Swiss Chard, some zucchini, and a few more watermelons.
Soil Minerals Resources
Books
The Intelligent Gardener by Steve Solomon & Erica Reinheimer is the best single volume reference on soil minerals for the home gardener. If you want to learn why and how to balance your own soil, this is the place to start.
Weedless Gardening by Lee Reich covers intelligent irrigation systems, as well as mulching and raised beds.
Advancing Biological Farming: Practicing Mineralized, Balanced Agriculture to Improve Soils & Crops by Gary Zimmer is geared to farmers, but has much excellent information in it.
The Farm as Ecosystem, by Jerry Brunetti is also aimed at farmers, but if you really want to understand how all the pieces work together, this is the book to learn it from.
Soil testing lab
Soil test interpreter
(Sort of) Local amendment suppliers
More Information
I may be available for as a soil consultant (after farm chores are complete!); contact me, if you are interested in having someone walk you through the entire process, including interpreting results and supplying the final soil prescription amendments.
Soil Remineralization
This piece is based on my notes for a talk presented at the NOFA-NJ Incubator Farm Open House at Duke Farm, on October 11, 2015.
First of all, this talk is based on a 2-day seminar I attended with Bio-Nutrient Food Association founder Dan Kittredge, and 3 recommended books. It’s a complex topic and I have a feeling I may run out of time, so let me share my online resource page URL right off the top. Anything I don’t get to is covered in the materials listed there.
While the title of this talk is “Soil remineralization” (say that 3 times fast), we actually need to take a step back first and talk about soil biology.
Research is revealing amazing and complicated connections between soil biology and plants. It’s as if the soil microbiome serves the same function to the plant as our own gut microbiome does to our digestive and immune system. Most of our soils–especially if they’ve been used to grow food for many years, with repeated tillage–and organic matter amendments aren’t optimized as well as they might be for a maximally healthy soil biology. If our goal is bionutrient dense food (and who wouldn’t want to get their nutrition from food the way we’ve been designed to do), then we need to create a vibrant and diverse soil community.
So let’s quickly cover what good soil biology needs to thrive. First of all, when I talk about soil biology I’m using it as a shorthand to cover all the micro- and macro-organisms that live in the soil, everything from the teeniest bacteria, to the longest fungi, to the earthworms. They all need each other (along with plant roots) to thrive. They also need:
- Oxygen–that’s why tilling the earth has been a staple part of growing food for so long. Dense soil needs opening up, and the quickest way historically has been to dig it and turn it.
- Consistent Water. Pretty much self-evident
- Carbon source, i.e. Organic matter: compost, humus, cover crop residue
- Minerals: there are certain minerals without which the system simply operates at a substandard level: this is the level most of us are accustomed to seeing. We just don’t know what really healthy plants look and produce like.
Before doing anything at all with minerals, it is vital that you address the other 3 factors.
The problem with tillage is that it destroys the very community we are trying to build up. But how can I create an nice tilth to my soil if I don’t till it? There are several layers to the strategy. Permanent raised beds that can drain well (each little void in the soil can have either air or water in it, we need it to be balanced). Using cover crop roots to break up the soil and leave little channels as they decay. Well-mineralized biologically active soil will naturally have good tilth.
Water: irrigate to get the bed consistently moist. What you are watering is not the plants, but the soil microbes. Drip irrigation on a timer to water a small amount each day to total 1″ of water per week is ideal and not that difficult to do in the garden.
Carbon source: leave the residues, turn them under (set tiller to no more than 2″); use organic mulches; compost when necessary (but be careful as it can easily upset your mineral balances). Never leave bare soil, as the organisms need the roots, or the dead organic matter to survive.
So that leads us to minerals. The key is to balance them within your own soil. No one-size-fits-all soil amendment can help.
We’ve got the big three N-P-K Nitrogen, Phosphorus, and Potassium, then there’s magnesium, sulfur, and sodium, and the trace elements of boron, zinc, copper, iron, manganese and micro-nutrients cobalt, silicon, selenium, molybdenum.
All play a role in plant health/soil biology. If you’re deficient in any of them things just won’t work well. When you’ve optimized conditions for soil life and balanced the minerals, miracles start to occur. Plant tissues become resistant to most diseases; they also fail to send out the signals that attract pest insects; they yield unimaginable quantities of fruit; they don’t need fertilizers to stay healthy. Unfortunately, I can’t point you to any studies that “prove” this scientifically. There’s simply been no way to get funding to do real research (although there is this New Zealand study about to come out that is notable). Anecdotal evidence, however, suggests that we are on to something.
I’m going to give you a very quick outline and a set of resources so you can test your soil and figure out how to improve its mineral balance.
Step 1: test your soil.
It is very important to sample a number of places in your garden; for a half acre, I usually take 9-12 samples. For several hundred square feet, 6 is probably plenty.
You’ll need: a zip-lock bag and permanent magic marker. I like to label the bag before I start so I don’t forget.
A clean (with water) digging implement or soil corer. Steel is a good bet.
A container, plastic or glass (glass is a no-no in fields used to produce food commercially) to put the samples in.
Don’t sample weird spots that you know are different from the rest of the area. You are trying to get a representative sample. Soil probe is simplest, scrape away anything growing and any mulch, then just jam it in to a depth of 6″ and pull it out and dump the soil in your container. There are a number of ways to use the shovel. Simple method is to dig a small hole 6″ deep (you may wonder if it really is important to get the depth just right–trust me, it is! Your soil test calculations will be based on this depth and will come out all messed up if you get it wrong. If you absolutely can’t test down to 6″, you can record a different number on your soil test request, but, keep in mind that if you can’t dig down at least 6″, your plants are going to be in trouble anyway), then shave a 6″ deep slice off the side of the hole.
Mix 6-12 samples together in a bowl; I try to sift out the large bits of organic matter and earthworms. No need to send them on an interstate trip.
Sample each growing area separately. If you just have one big garden bed, you can get away with one sample, but if you’ve got a yard, a perennial planting and a vegetable garden, you’ll want to do them separately.
Put about 2 cups of soil in the labeled baggy.
Do not send your sample to Rutgers Cooperative Extension. They will not provide the results that you need to do a complete analysis. Logan Labs provides everything you need for $25 and even more for $30. Loganlabs.com (this and all other references are on the website resource page I prepared for you). Download their soil sample worksheet and fill it in. You can fit 3 soil samples into a US Postal Service small flat rate box. Mail it and they’ll e-mail your results.
Here’s an example, of the results that you will get e-mailed to you in about a week. Sample soil test report
Now, how on earth do we interpret this? If you want to the details, I highly highly recommend the book The Intelligent Gardener. It covers everything I’m talking about now and much much more. This isn’t a quick easy solution, though, so, let me offer something simpler.
One of the co-authors of The Intelligent Gardener has put a calculator on her website. For $19.50 per year you can go to her site, fill in the results from your lab report, together with the size of your garden and you’ll get a soil prescription. If you’ve read the book, you might want to change the inputs slightly, say by substituting gypsum for some of the bone meal as a calcium source, but what she recommends will work. She includes a Nitrogen source and recommends adding kelp meal to supply micro-nutrients and this is very important (and much easier that trying to add cobalt directly!). Mix everything in to a depth of 6″ (and realize that it is just going to take some time before you can get to a very low till situation); also consider ground humates whenever adding minerals.
Restoring soil biology is beyond the scope of this brief overview, but here are some quick tips. Get some mycorrhizal fungi and add at planting; add effective microbes to a pre- or post-planting drench (EM-1, for example); space plants way farther apart than you are used to; no mono-cultures; mix up your plantings; stop inverting your soil–stir, don’t roto-till.
Week of 10/5
There’s still some zucchini, though it is producing less and less. I’m guessing we still have a week or two left. We have plenty of tomatoes, beefsteak, salad, and cherry. Swiss chard is going strong and the watermelons continue to ripen. The kale that I planted last month is growing well, and should be ready for harvest in a couple of weeks. We are now officially out of garlic.
How the taste of tomatoes went bad
Here’s an interesting article from NPR that describes some of the reasons I love to grow heirloom tomatoes. As far as I’m concerned, if it doesn’t taste good, it doesn’t belong in my field! How the taste of tomatoes went bad